The Ultimate Guide to Sidechain Compression in Ableton Live
Pump My Ride, Sidechain My Heart
The subject of this article is pretty techy – and for this reason there is almost no chance to go informal and easy… still I’ll do my best not to make you driving up the wall… or nail-biting.. or both).
For those in the know (and for those who not) – these days it’s pretty hard, almost impossible to find an electronic music track (low-end heavy as a rule) where there would be no single instance of sidechained compressor used. Here are few examples of sidechain compression in action:
Proper handling of this technique — is one of the things that separate the men from the boys (sorry gals, just a fixed phrase) so please read on if you like the backstory. It’s a somewhat finicky tech— but well worth it!
Tons of pages on the subject have been printed through the years by dozens of sound producers and mix engineers. Still the catch-all and clear overviews happen not too often. Apart from that — new plugins are popping up on the market regularly so I’m giving it a shot, providing an overview of my own that hopefully would be of help both for the beginners and intermediate level producers. For the latter — I guess you won’t rant and rave, re-reading things we already know pretty often brings extras to the table — happened dozens of times to me and still happening. So let’s dig it!
SHORT TECH INTRO (and whatnot)
Sidechaining is a part of versatile compression techniques family (there’re at least 5 of them that I know but I’m sure there are more). Some use “sidechaining” and “ducking” as identical terms, but I would differentiate them for clarity: SIDECHAINING means modulation of the destination track with a source track (e.g. BASS channel— KICK channel classics) with modulation happening ONLY when there is a signal present in the SOURCE track (with GAIN compensation as the only exception). While DUCKING means modulating the destination with continuous LFO-like effects (e.g. AUTOPAN) that act constantly and in the most of the cases placed as an insert in the plug-chain of the track. Still I do not mean there is an ultimate truth delivery with my interpretation – the only point was to mention that these 2 terms are not 100% identical that could have misguided you at a certain point.
ADVANTAGES IT BRINGS (and how to get on a roll)
So why should we invest our precious time learning it? Using these techniques we can create a controllable rhythmic fluctuations (e.g. our nifty pumping effect) of audio content either by level or by level and frequency (in case with complex dynamic EQs that got built-in compressor with sidechain option on board). PSHT you say! WTF! Can’t you just use another wording?! Well… got no intention to talk your ears off— but the wording, however fancy it is — doesn’t change the point. We are talking electronic music here (let’s call it EDM to simplify) and those rhythmic movements is flesh and blood of it.
Techniques we’ll be digging here can be used in multiple ways for solving versatile tasks, both technical (during mixing & mastering) and also the creative ones. The benefits for those who learn how to use it properly are top-notch— it helps to solve frequency conflicts aka masking (not only in a kick-bass pair, but also in kick-low synths, synths-vocal, synth-FX, you-name-it pairs). It adds extra movement to our instrumental parts. It allows to do miracles with reverb and delay tails when used on returns track. It’s used for de-essing, and so on and so forth.
It will make your tracks sound far more groovy, catchy and “pro”
Note that mastery of these techniques may result in a noticeable increase in drink tickets, remix offers and dates.
Ableton.com quote (Manual)
HOW TO’s & SOME SWANKY PRACTICAL EXAMPLES
1. CLASSIC (OFFHAND) EXAMPLE – KICK-BASS DUO
That’s the easiest way to see the sidechaining in action: Place Live’s compressor onto the target track (bass). Unfold the sidechain section with a triangle icon (upper-left corner), activate “sidechain” button and select your kick track from the “Audio From” drop down menu with your kick playing simple 4 x 4 pattern. Set Attack to 0.01, Ratio to 5:1, Threshold to -25 dB, keeping Release “Auto” and raise your Gain slider to 6 dB and you will get a general feeling how the whole thing works. That’s the easiest and probably the best way to do sidechain compression in Ableton Live.
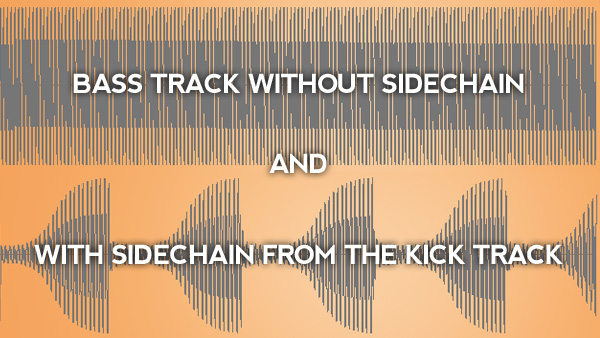
Bass sound without and with sidechain compression:
Same bass sound (without and with sidechain compression) together with the kick track:
EXTRA TIP 1: Don’t forget that Ableton Live 8 Compressor is still available as legacy product and it brings far less clicks at short attack times vs his Live 9 counterpart, and you may get it here. Live 9 Compressor clicks heavier than Live 8 in his “FF 2” mode when set to extra short attack times, so I do recommend using the legacy version for pumping purposes (and especially its FF 2 mode).
EQ section is used to accentuate the band of the signal that will be acting as a trigger on tracks or buses we wanna influence, for example cutting down the lows and keeping only the high-mids (> 1 kHz area where kick’s transient sits). It also makes possible shortening the time needed for our bass to recover to previous levels when our trigger (kick) signal disappears in the chain. Gain Knob here is used to add extra level it the signal from the kick is too low + it allows you to accentuate the pumping effect even more when needed. Gain Slider (right section of the plugin) is used for compensation of level drop caused by our trigger signal (kick in this case).
EXTRA TIP 2: You gotta keep an eye open on the levels before and after sidechain compressor, not to ruin the volume balance in your mix you could have spent days crafting.
2. SYNTHS AS A SOURCE
Different elements may be used as a source/trigger for sidechain compressor, actually almost any drum-like one shots (short synth sounds) with controllable attack/release parameters will do. For more flexibility — take any synth with controllable ADSR envelope, playing with its Attack and Release settings you will get extra controls over your sidechaining behavior.
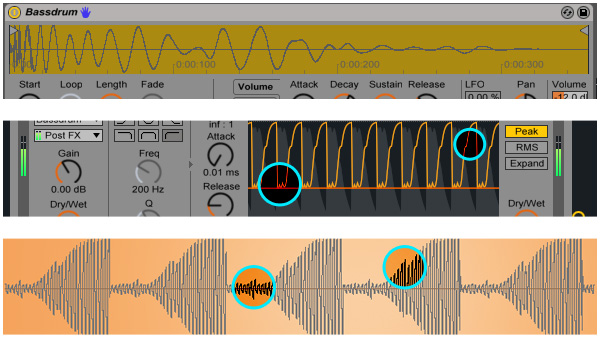
EXTRA TIP 3: Some drum samples may have distorted shape and as a result your sidechained track may sound “floating”. Below is a simple illustration of what’s going on when you use kick drum with distorted waveform as a trigger. In such cases, using a synth as a source for sidechain compressor may be a better choice.
3. MULTIBAND SIDECHAIN COMPRESSION
Multiband sidechaining is another option – have a look at the free rack Abletunes has to offer here (though I’d keep it for experienced users only). Using this sophisticated technique you got an option keep the overall volume balance untouched while solving the low-end kick-bass conflict where only low frequencies of the bass will get influenced by incoming kick triggers.
Using this technique – the fluctuations of overall level are far less noticeable (vs standard sidechaining method) as they happen in a certain frequency range. Especially when you work with low frequency range – you will need a good audio system with extended low end or professional headphones to hear the effect.
You can also use built in sidechain option by clicking on triangle button next to the on/off-button.
4. AUTOPAN TRICKS
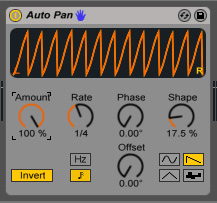
AUTOPAN in mono mode could provide you some great a-la sidechain ducking with no source signal involved. Nice tool, using in on a daily basis to create either volume or pan fluctuations in my projects. Set Phase to 0, change Sync from Herz to Notes, Amount to 100 and start tweaking the Shape and Waveform parameters to get the result to fit your track.
If you’re looking for a nice 3rd party options – I could recommend Cableguys’ Volumeshaper (commercial), GVST’s GLFO (free), Nicky Romero’s KickStart (commercial) to name a few.
Make sure to check Sidechainer rack based on Autopan.
5. USING UTILITY
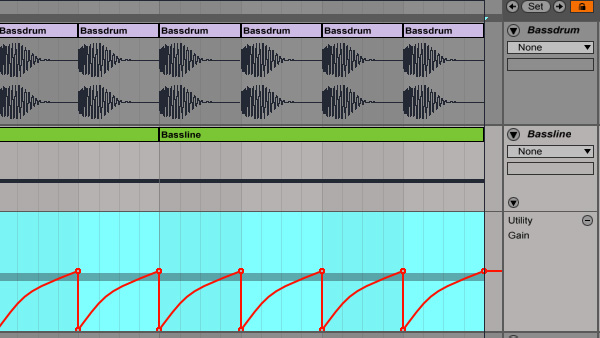
As we work with our levels using sidechain techniques in most of the cases – you still may use Utility for the purpose, but I wouldn’t recommend using it as a rule as it’s VERY time consuming. So don’t use Utility for that unless you’re really HAD TO in some specific cases (those who spent hours automating a parameter in a 5 min long track and had to re-do it again due to some mistake or bug or whatever will understand me perfectly). Utility is an excellent tool but mostly used for another purposes.
6. THE GLUE AND AUTOFILTER. SONGS OF PRAISE.
Probably somebody missed that both Glue Compressor and AutoFilter got a sidechain sections that could be opened using the same triangle icon in the upper-left corner. While Glue Compressor got discrete Attack/Release settings it’s not that flexible as a general Live compressor, but still it can be set up to work nicely while sidechaining AutoFilter yields fantastic creative effects.

Fantastic SSL-bus-emulated The Glue Compressor (its standalone bit more sophisticated version sells at nifty 99.00 USD price from Cytomic) and incredible, analog filters updated AutoFilter (Starting from Live v 9.5) will make you bonkers as soon as you will manage to tweak them properly. FANTASTIC tools, highly recommend to invest time in mastering them first prior then switching to 3-rd party plugs (that pretty often cause extra crashes and bring additional instability in our already complicated studio scenarios).
“How does their plug-in compare with established offerings from Waves and UA? … The Glue sounds more open and has a more defined stereo width — and it certainly provides ‘the glue’ on a variety of instruments. It’s kind of a ‘more of everything’ compressor, and at a great price too!”
– Sound On Sound Magazine Nov 2010 Issue
7. KEEP IT SYNCED
I do recommend to use similar attack/release setting at your side-chain units to assure synchronized movement of audio material on different tracks, though you could still play with release times keeping them as integers of 2 for even more sophisticated fluctuations.
EXTRA TIP 4: It makes a big sense to “unlock” your eyes from the screen from time to time, both during production and mixing (and of course when you set up your sidechain compression— remember we produce music that’s perceived by ears) So I highly recommend to install something like CLUTTER CLOAK, a free utility (PC) that makes your screen black thus allowing you to use your ears only. It activates/deactivates with a short cut that’s very handy and will help you a lot as you go.
8. GO RACKS
For the happy owners of the MIDI controllers (with Akai APC/Push owners to be the happiest peeps I assume, though any MIDI controller will do) creating a simple Sidechain Rack will be of great help — assign your Ratio/Attack/Release/Threshold/Output Gain to Macros and you will reach another level of flexibility. Following the advice above — you’ll be able to tweak your compressor settings even with your screen faded out reaching even better results (applies both for sidechain, peak and RMS compression).
What’s more — you may add several compressors of your choice to the rack as a chain and assign the same parameters from every compressor to the Macros you already have (don’t forget to map ON/OFF buttons on them with only one (!) from the chain working at a time.
This way you’re getting a nifty solution for all your compression needs! Just go and grab it
EXTRA TIP 5: For those who wanna dig the science bit deeper, you may used use this simple formula to set the attack and release times: dividing 60000 / BPM of your track will give you the length of 1/4 note in milliseconds, e.g. 60000 /125 BPM = 480 ms. If we keep on dividing we’ll get 480 /2 = 240 ms=1/8 note, 240/2 = 120 ms = 1/16 note lengths. Set your release as 120 ms in 125 BPM track and you will get your sidechain perfectly synced to the tempo.
Still it’s only one of the options of setting it up – there is no ultimate truth here. Alternatively you may use another approach – put your attack to minimum, ratio/threshold/release to maximum, launch the playback and start shortening the release. At a certain point you will clearly get that pumping effect popping up.
Hopefully this article brought some worthy extras to your table, so try some of them in your projects. Invest time and effort in “mastering” it and…
…and remember the quote at the top)
Take care.
Article by Andrey Romanenko
