How to Be Productive as a Producer
In this day and age, the wide range of audio effects and workstations available give producers an unprecedented amount of choices when it comes to sound. Unfortunately, the more options one has, the more decisions one has to make, and this can be the biggest roadblock for budding producers trying to turn initial ideas into complete arrangements.
Keeping this in mind, the best methods to clear ‘producer’s block’ are often methods that restrict, guide or organize the musical choices we have to make, so that we aren’t overwhelmed by having to make too many decisions at the same time. Below you can find some techniques to add to your toolbox as a producer to increase your productivity. Most of these may seem like common sense, but they’re also very easy to forget in the heat of the moment.
Add a recent favorite track to the session and use it as a guideline for structure
This suggestion may rub some producers up the wrong way (as it could be seen as “ripping off” another artists song), but the reality of the matter is that everyone has to take musical influence from somewhere. Using some of your favorite music to directly guide the structure and general style of some of your own tracks can serve as a great productivity tool, as well as a deeper insight into how some of your favorite artists structure their tracks. If you ever find yourself asking how you can develop your 4 bar loop into a complete track, this technique is worth trying.
Save self-designed sounds as presets and group effects chains in racks
This is one of those tips that seems almost too obvious, but is also very easy to ignore when trying to focus on other production tasks. Either way, it’s a worthwhile process in the long run- the short time investment needed in getting into the habit of naming and cataloguing presets will pay dividends when you’re trying to access the synth you designed months ago, on a project where you’ve already flattened all the stems.

Know your sample library, organize it better!
A good sample library is the cornerstone of music producers regardless of genre (assuming you have limited access to a professional recording studio and/or professional musicians to play out your ideas). Access to all manner of drum kits, instruments and one shot ambient sound effects are truly indispensible advantages of having a sample library, and having all these possibilities at your disposal is the first step towards streamlining your music production process.
If you already have an extensive sample library, though, there’s a good chance you’re missing out on the timesaving potential it holds by not keeping it well organized. Most sample packs handle will handle some of this organization for you in terms of separating instruments, but a well-organized sample library will need to consolidate all of this separation in one place for maximum efficiency. You should be able to access any sample you need in 3 to 4 clicks, which can easily be organized by good use of the “Places” tab in Ableton. As well as being the go to tab for directories like the Desktop and “Downloads” folder, using “Places” can be a good way to start creating your taxonomy of samples.
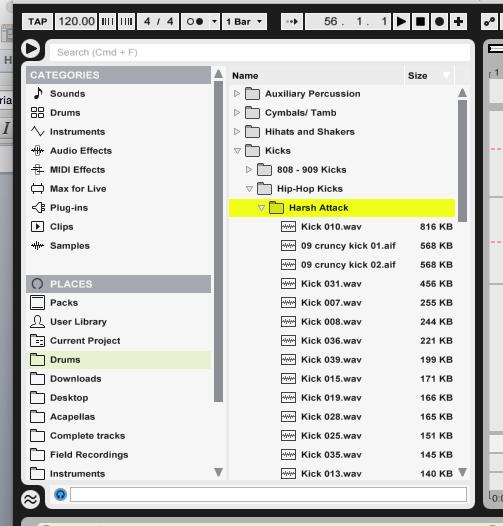
A good first division to make in your sample tree is between different instruments – most sample packs will already make this division – but where you go from there depends on how you produce. If you often jump between a number of different genres, sorting samples by genre can be helpful; otherwise, the best way to divide your samples is often by their sonic qualities. Basic divisions could include separation into sounds with high and low fundamental frequencies, long and short release, and harsh or soft attacks. Another useful way of sifting through samples, especially one shots, is by ordering them by size within the “Places” tab. This way, you are able to organize the samples by their overall length, regardless of folder organization.
Separate your social media use from your production time
No one’s denying that a good hustle on social media channels and an ability to foster a rapport and relationship with fans or potential clients is an extremely useful means of exposing your music to a wider audience and keeping people interested in what you’re doing. However, this doesn’t mean you have to be always on and open to what can be a sea of distractions and irrelevant information. Try and aim to have as few applications as possible open while you’re in a producing session. Not only will it help you focus on producing, it will also help run CPU-intensive tasks. If you can manage to part with your Wi-Fi connection entirely while producing, that can give you yet another boost to CPU power which you can put towards more CPU-intensive tasks in Ableton. You can read more about maximizing performance in Ableton Live here.
Create a template for starting new projects
You may have found during your time producing that once you get the inspiration and time to produce, the start of your producing session can follow a familiar routine: create a drum rack, set up effects sends, load in samples and instruments…
All the while, during this time the spark of inspiration may have already died down and you may have lost the original musical ideas that were brewing. Inspiration can be a fickle, time-sensitive beast at the best of times, and because of this it’s always a good idea to have your DAW automate the manual work so you’re able to get straight to business.
Optimize your workspace for productivity
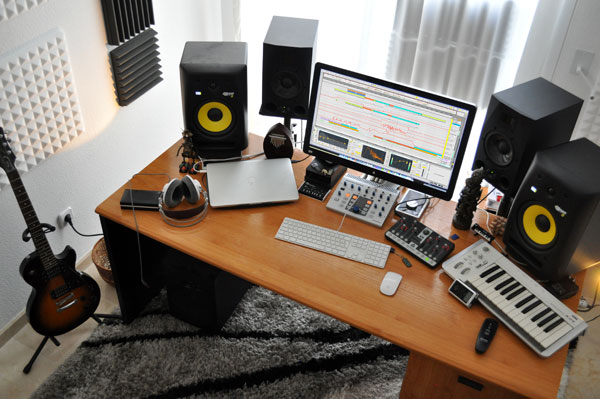
An optimal workspace is another asset in your productivity toolbox that can take time and thought to set up, but easily pays its dividends in the long run. Certain qualities in a workspace – adequate light, eye-level computer monitors, and a chair that doesn’t cause you back pain after an hour – are a must for any set-up. Other components in your workspace, such as keyboards, MIDI controllers and studio monitors, need a more tailored approach.
Studio monitors should generally be placed so the tweeters form a flat, equilateral triangle with your head when you’re seated, to put you in the monitors’ sweet spot and give you the best chance of a balanced speaker response. This will hopefully mean less nasty surprises when you check the mix through your laptop speakers, and as a result, less time tweaking the final mix for playback.
Input components – MIDI controllers, mice and keyboards – should be arranged so that the controllers you use most frequently are closest to your hands. A MIDI controller keyboard mounted on the front of your table may seem like a bit of an industry-standard setup, but if you’re not using it frequently every session, all it’s going to be giving you is arm strain while you try to reach your computer keyboard!
Until you’re comfortable controlling your DAW using MIDI keyboard commands almost exclusively, it’s usually a better idea to position MIDI controllers off to one side of your table for easier access to the traditional input devices – the computer keyboard and mouse.
Don’t overwork yourself!

When it comes to producing, the line between overwork and laziness may not be very fine, but it is all the same quite easy to cross. The biggest influence on creativity is undoubtedly the state of mind the creator is in, and sleep and general lifestyle both affect state of mind heavily. Numerous studies have found links between increased sleep and creativity, but optimizing your state of mind for creative work isn’t simply about getting enough shut-eye. The lifestyle you lead inevitably filters into creative work – “art imitates life” as the old aphorism would have it – and if the majority of your time is spent sitting in front of a computer screen, the creative life-force you have to draw from will die out much sooner than you’d like.
Even if you hold to the assertion that music is your life, that still includes listening and enjoying music as well as making it! With this in mind, there are plenty of excuses to get away from the computer screen every now again and catch a performance by your favorite artist before you channel those ideas into your own work.