5 Easy Ways to Maximize Performance in Ableton Live

In the days of digital audio production we have a whole new set of problems to deal with. Here are a few tips that will help you get your sessions and computer fine tuned and ready to rock.
1. Preferences in Ableton
Once you are in your Ableton Live preferences select your “Audio” Tab. You will want to turn off any “Input” or “Output” channels that are on in your “Channel Configuration”. Ableton will see this as active if not de-selected and this can affect the audio processing power. The next thing is “Sample Rate”. I prefer to do everything at 96k and 24Bit , However, this will gobble up your CPU power very quickly. Try using 44100k instead and this will free up a lot of CPU.
Next we will cover the “Latency” section and “Buffer” size. Typically 256 or 512 are what I like to use as my buffer size. If you are recording audio you will need to set your buffer to a lower setting. Try 128 or 64 to keep your audio from having latency when recorded. If you use a higher buffer size during recording Ableton will actually place the Audio in the session with the latency causing your audio to be out of time.
The next thing you will want to do is visit the CPU tab. You will want to make sure that “Multi Core” Processor support is enabled if your computer has multiple processors.
2. Audio Dropouts
If you are experiencing dropouts in audio or crackles during playback this is a Disc Overload error. The overload will be indicated by the orange “D” icon in the top right of the screen.
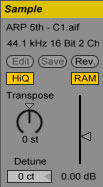
To avoid this you can select “RAM” button in the Sample box. Be careful to pay attention to the disk usage when doing this to not get an “Out of Memory” message.

Also you can try to use a lower “Sample Rate” for your sessions. Try sticking with 44100, if you are having computer issues.

Be sure to store backups of your sessions. I had a large session that froze like this one time and it could never be opened again because the RAM could not load the session properly.
If you are fortunate enough to have an SSD in your computer then you will have a lot less problems with your sessions. SSD’s will start up literally instantaneously and since they have no moving parts the read and write time is remarkably faster. I recommend using an SSD for your applications and sample libraries. You will be stunned by how fast Ableton runs when loaded from an SSD. You can setup your computer with a small SSD (128GB) and a very large HD for backups and to store regular files on.
The performance of an SSD versus a typical Hard Drive is beyond the scope of this blog article but for exact specs here is a link.
I suggest not storing any files on your desktop either. Any audio files, mixes, or movies will be stored by your computer in it’s RAM. This is so they can be quickly auditioned. I also suggest having at least 8gb of RAM ready to go for your Ableton computer.
If you are using a 32bit system it can only utilize 4GB of RAM. Having 8gb of RAM will at least let you use your computers full potential without having any issues from other apps that may keep RAM on hold. 64bit is the way to go for sure, with 64bit it can utilize somewhere around 1000GB depending on what chip and speed it runs at. The only issue with 64bit is that it tends to not work with some 3rd party plugins. If you are using all Ableton plugins then definitely go with 64bit.
3. Dealing with Tracks/Channels in Ableton
When dealing with Midi or Audio you will inherently end up using EQ’s Compressor’s and other effects to get your mix to sit right. When dealing with large sessions and using lots of processing you will find your CPU gets maxed out. A workaround to this is to “FREEZE” your tracks. This will essentially render the midi or audio and all of the plugins on that channel. This is also useful if you are sharing sessions with a friend. Once the channel has been put in a FREEZE state you can open that session even if you do not have the plugins on your computer. This is very cool when doing collaborations since not everyone has the same plugins. Next you can “Flatten” the track as well. If you are sure about the EQ, Compression and Effects you have on a track and don’t need to do anymore processing “Flatten” it. This will render it with all effects and leave just the processed audio behind.
Anytime when using CPU heavy plugins be sure to “Group” channels and process them as multiple channels instead of using the same plugins multiple times. You can also do this by using “Return” channels. I have a template setup that has my favorite Delays and Reverbs on Return Channels. Always take advantage of creative bussing and routing options to save CPU. Also processing multiple channels with the same plugin can make for smoother mixes and more even tones. If you have a lot of vocals for instance use a “Group” and process the vocals as whole instead of using the same Plug Ins multiple times.
4. Audio Samples
When you are dealing with audio in Ableton there are a couple of unique ways to handle them properly. First of all any audio files that you have “Warped” already using “Complex Pro Mode” or “Complex Mode” You should “Consolidate” them to save RAM. You can also use the “Clip Ram Mode”. When this is activated Ableton will load the Clip into its RAM instead of reading it directly from the HD in real time. Any audio that has been edited and has sections that are no longer needed should be “Consolidated” or “Crop” it so that you don’t have a large stockpile of samples stored in your RAM. Keep your samples as short as possible and keep clean sessions and this will help your HD deal with the load of large sessions.
5. Turn off any applications except Ableton
Ideally you want to have a production computer that is used just for music. If you are using your daily computer for production make sure to turn off all of the other apps that may be running in the background.
For the PC it’s Ctrl+Alt+Del to enter the task manager, for the Mac it’s Cmd+Option+Esc. Whichever OS you’re running use these application managers to kill any unused programs in the background.
These tips should help get you on your way to having lightning fast load times and keep your sessions in check. Keeping a clean and well maintained computer and being aware of what the session has going on is key. Hopefully this will help you enjoy your Ableton experience even more!
Article by Steve Primo


