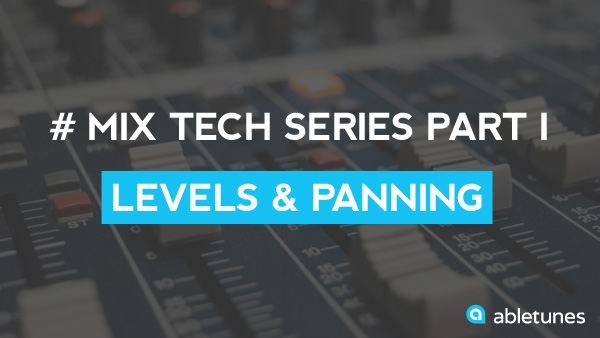
Mix Tech Series Part 1: Levels & Panning
Theory basics, selected studio practices and a few pro-grade Utilities to grab for free
Hey-day, Music Makers!
Having received some feasible feedback to my previous articles dedicated to some “niche” aspects of mixing, I decided to launch a Series of articles devoted to mixing as a whole, sharing some of the techniques I selected (having spent > 10 years hard-digging the subject that devoured me in my teens). Mix Tech Series will consist of 5 articles to follow the 5-Stage-Mixing-Sequence I compiled for myself.
We’ll be using Live 9.6 Suite native tools mostly (“Less is More” indeed, I wish I realized that earlier) using relatively simple but efficient classic techniques to:
1. Properly Set Up Mix Levels & Get The Most Out Of Stereofield
2. Manage Frequency Content Using 4 Different EQ designs
3. Control Dynamics With 3 Compressor Types
4. Add Depth With Reverbs & Delays
5. Practice Some Mastering Sequences
The idea behind is to provide an overall picture of mixing audio, without going into much details as this subject is really HUGE. I’m sure that you will have a better vision having read the whole set and applying the tech of interest on practice to progress faster and reaching your goals sooner.
To make the reading and navigating bit more comfortable, I will keep every article in the Series split into the following parts: # INTRO# DEEP TECH # STUDIO TIPS # SELECTED FREE TOOLS
# INTRO
As practice makes perfect, let’s recollect what mixing is all about, what does a “good/pro mix” means? To simplify I would describe “mixing” as a process of creating a stereo file from a multi-track recording (either recorded in the studio when talking about live music genres, printed/converted to audio when by a digital artist in his DAW or being a mixture of both methods). As a rule, mix engineer gets a folder containing mono/stereo audio files where each file corresponds to one instrument. And the task is to transform all that layers into a cohesive whole.

What stands for a “good/professional mix”? There are versatile wordings circulating in the Web, but as for me I like the one from Eddie Bazil he used in his “Sound Mixing: Tips & Tricks” book, where he formulated the following criteria that “good = professional mix” should be demonstrating:
1. CLEANLINESS – no artifacts/noise/hiss/pops
2. CLARITY – no mushiness
3. SEPARATION – no micbleeding, no frequency clashes
4. PROPER LEVELS – no dramatic level fluctuations through the track + it should not be far too quiet or loud
5. PROPER BALANCE – frequency- and stereofield-wise
6. PASSING “GENRE TEST” – the track should fit the actual genre demands, even if there should be no strict rules (still better keep it for the future as we must learn the rules first, and only after that we may start breaking ‘em)
7. PASSING “ ENVIRONMENT TEST” – translate properly on versatile systems — from inexpensive in-ear headphones and mono smartphones to multi-kWt PA systems
From Mastering Engineer point of view (and that’s an important thing to add as without keeping that in mind the formula I’m describing would be incomplete)— apart from all that mentioned, the result of our mix session should look like a lossless 24-bit wav/aiff stereo file, peaking at -6 dBFS at the loudest track segment.
If you do basic mastering yourself than you perfectly know that it should be peaking at 0 dBFs max, and demonstrated perceived loudness depending on the genre laying somewhere within -6 to –10 dB RMS (LUFS/LKFS) range. (What you probably did not know is that the peaks we are talking about should be measure with True Peak Meter, and our audio file should demonstrated Crest Factor higher than 6 dB, as only in this case audio file considered appropriately/ moderately compressed).
# TECH: SETTING THE LEVELS RIGHT
TERMS:
GAIN: Typically we refer to transmission gain, which is the increase in the power of the signal, almost always expressed in dB, e.g. increase in the raw signal from your guitar or microphone before it goes into other component.
VOLUME: power level of a signal. When you turn up the “master volume” knob on your amp, you’re increasing the amount of power used by the amp to increase the signal.
LEVEL: Magnitude of the sound in reference to some arbitrary reference, more specifically — SPL (sound pressure level) also expressed in dB.
LOUDNESS is another monster, even though similar to volume and level) Since human ears are not able to hear each frequency at the same level, perceived loudness is different as we move up and down in frequency. Read about Equal Loudness Contours & Fletcher–Munson curves to get more info.
UNITY GAIN: Fader At “0” , thus not affecting the level of the signal passing through the channel.
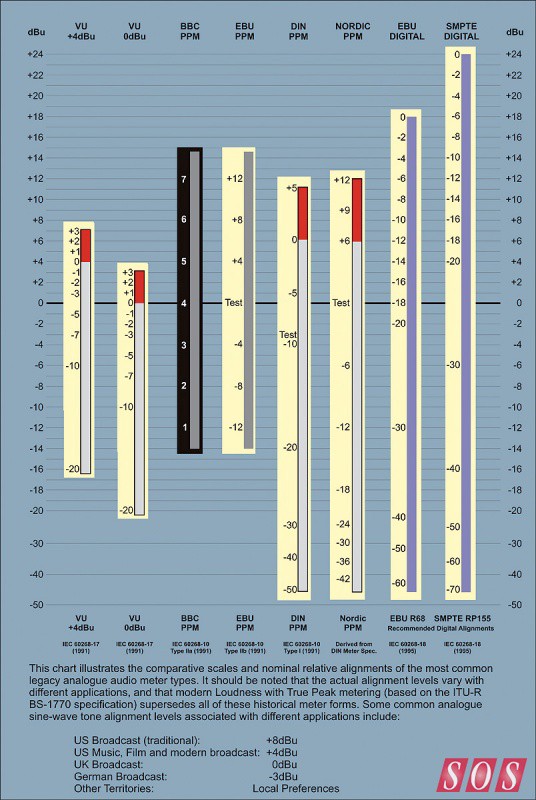
Signal levels and scales in digital and analog domains may get you nuts in no time but to simplify lets’ take + 0 VU (0 dBU) in analog correlating to -18 dBFS on a digital scale (EBU digital) and here we are talking about peaks level (that’s why Live Samplers/Synths are -12 dB by default I assume + you may offent see +18 dB on analog gear master faders). Why do we need to know that? It’s not only about the “good old analogue days”, but our audio chain today still contain the analogue section — that it our D/A converters at the output of our sound cards — so knowing your levels is important not to fry them out and avoid both analog and digital clipping). Another practical aspect of understanding that —ability to calibrate our monitors and set our listening levels properly.
So I’d recommend you to set all your tracks to peak within -18 dBFS / -12 dBFS range, keeping your Bus/Group/Sends/Master faders at Unity Gain, before you begin the session. Having settled that — proceed to rough volume balancing at the loudest part of the track keeping the max peak levels on Master Bus not higher than -6 dB. If you’re mixing in a non-treated room, use both your ears (hopefully accompanied by a pair of decent near-fields and monitoring headphones) and Spectrum Analyzer that Live has on board, keeping that -3 dB pink noise reference curve at hand (surf the Web for more details). Mix at low levels (for the geeks— it should be in the vicinity of 78–83 dB SPL C-scale) for no-geeks — it should be as quiet as possible, like normal conversation levels.
As a starting point I would take the loudest genre-specific element (e.g. Kick for Techno/House-like tracks or Bassline in case with D’n’B and the like), adding the second loudest element on top of that, and paying special attention to the vocals if they are present, building up the levels the rest of the instruments around according to the concept of the track.
#TECH: STEREOFIELD MANAGEMENT
TERMS:
ABLETON PAN LAW: Live uses constant power panning with sinusoidal gain curves. Output is 0 dB at the center position and signals panned fully left or right will be increased by +3 dB (+4.5 dB, +6 dB Pan Laws also exist). Live’s pan control is wrongly named — it’s a stereo balance control actually (acting as Pan Pot on mono tracks).
MONO FILES IN LIVE: When you place mono file on a track in Live, you see ONE level meter identical for both L/R channels, with our knob acting as PAN CONTROL as we pan ONE single channel between L/R channels.
STEREO FILES IN LIVE: When you place stereo file on a track in Live, you see TWO different level meters in the channel strip with our knob acting as Balance control in this case , balancing the levels of the two channels which remain panned hard left and hard right.
PHANTOM CENTER: a phenomenon when sound is perceived as coming from the the point located in between the left and right speakers. For that the audio levels should be identical in both channels and the listener should be located in sweet spot, where sweet spot is a focal point between two speakers, where an individual is fully capable of hearing the stereo mix the way it was intended to be heard by the mix engineer.
STEREO FILES vs L+R FILES: while STEREO could be characterized as a 2-channel file having some some L/R content identical and some different, L+R file means that L/R content is identical that actually gives as a mono file just played via 2-channel / 2-speaker system. While L+R is playing a mono source in two speakers, it that will be perceived as 3dB louder than if it were played in just one speaker (in case with +3 dB PAN LAW). DONT FORGET that STEREO MIX contains multiple layers, while STEREO INSTRUMENT FILE while is a single layer.
JOINT STEREO, SIMPLE STEREO, INTENSITY STEREO are audio-coding/conversion related terms and do not relate to our mixing needs at this point.
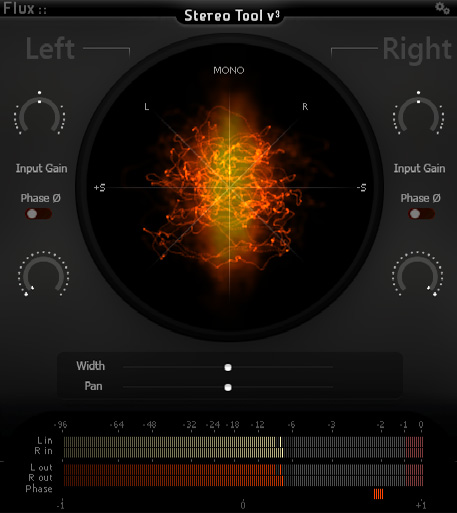
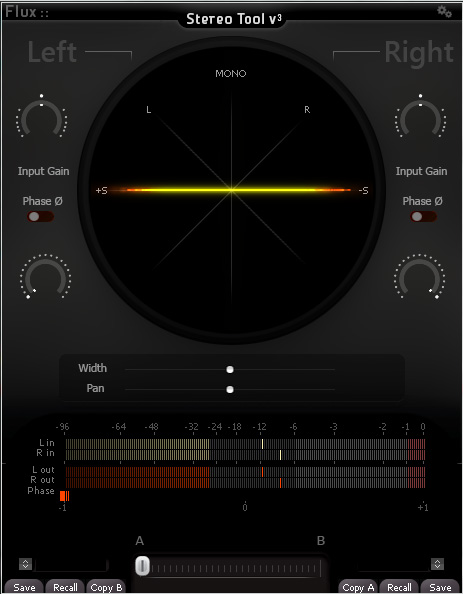
STEREO (Mid+Side)
Probably you’ve heard that first mixing consoles had NO panning knobs at all — just the switches that could be set to 3 positions only — Hard Left-Dead Center-Hard Right. That’s where the term LCR panning is coming from. There are different opinions on that technique, some like it some don’t, but in my opinion it’s a great place to start. Therefore I do recommend checking LCR approach to create a basic balance of our track key elements, and then you may break the rule and placing the secondary instruments in between. Keep an eye open on L/R channel levels to keep the overall picture balanced.
Also, when making your panning decisions I’d suggest to follow “The Upside Triangle” approach where the low frequency content is placed in mono (let’s say up to 130 Hz as a starting point) and gradually widens as it climbs up the spectrum.
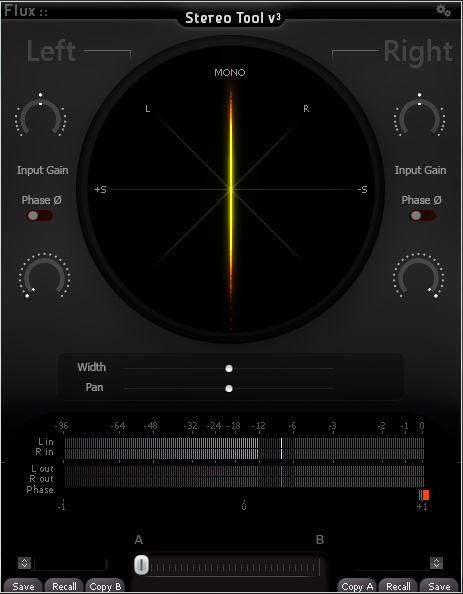
MONO (Stereo without Side)
NOTE: Remember to keep the majority of your instruments in mono — in the real-world the majority of sounds sources are mono.
What’s more — it accentuates the contrast between the widespread instruments and those pin-pointed to specific locations in the stereofield. Instruments benefiting from “stereo exposure| are pretty often genre-dependent, so it makes sense to keep key elements of our track wide, keeping the secondaries mono. Don’t get overwhelmed with that though— as Stereo Delay / Reverb applied to mono source makes it stereo) so — no worries) you will have enough of stereo.
Mid/Side Technique is a another worthy technique to use both at individual channels and Master Bus.
The concept behind — is to decode the audio content in stereo into Mid / Side Matrix (Mid = a mono component identical for both L/R channels, Side = a sum of audio content different in L / R channels where Mid + Side = Original Stereo File.
For those who hear it for the first time it doesn’t sound easy) But be strong)…
What else… You don’t have to keep your panning decisions static — lots of tools could be used to liven up it up adding movement, from pan-modulating LFO’s to dedicated 3rd party Auto Panners, Auto Filters, Frequency Shifters, etc.
Last but not least — DO regularly check your mix in mono just to make sure that there is no dramatic phase cancellations happening when you fold it down.
# STUDIO TIPS
1. Always start you mixing session placing a Limiter on your master bus! The sole purpose of that – safety reasons, to protect your gear and ears against occasional volume spikes.
2. Starting from version 9.5 Live provides both Peak & RMS levels on the channel strips (just keep the channel wide enough to make it visible). Still there is a perfect company to it — Sonalksis Free G Meter. I use it on groups/busses, and to check/compensate for Gain increase/loss during processing.
3. Key-map Arrangement View Locators according to the structural parts of the track — it will do a great job helping you navigate smoothly. In general invest time in learning Shortcuts and Architecture of Live, it start paying you out in no time.
4. Try to keep both channels populated symmetrically e.g. panning high percussion loop hard L —and panning your hihat loop hard R. Kick, Bass, Snare and Lead Vocal are panned dead center as a rule. Panning dry instruments 100% to one side and delay tails 100% to the other is another simple technique worthy experimenting with.
5. Use “Resampling” to capture the results of every Session you do for future referencing along with storing your Project at every production stage e.g. “Tracking 1.0”, “Arrangement 2.5”, “Mixing 5.0”, it will save tons of time at later stages.
6. Don’t install each and every piece of 3rd party software you stumble across. Do it when it’s a life or death thing. Learn Live’s native plugins in and out, they are more than worthy (especially after 9.6 fantastic updates) + Free Packs and unique M4L devices pop up at ableton.com regularly. Less incoming software will help you concentrate, your system will be more stable, and will run faster.
7. Some simple stereo-widening techniques to try:
HAAS: use Simple Delay with “Time” Selected, 100% Wet. Set Delay for L channel at 1 ms and for R channel up to 30 ms to your liking. Check in mono.
M/S WIDENER: EQ 8 in M/S mode, sculpt some low end content with HPF from Side signal boosting some Lo/Hi Mid content for a couple of dBs with a shelf will change the correlation between Mid/Side signal changing the stereofield. Increasing Side level makes our signal wider, and vise versa.
FREQUENCY SHIFTER: Set it 100% wet, activate “Wide”, keep LFO at 0, Mode: Ring and slowly tweak Frequency knob 2–5 Hz in every direction.
# FREE TOOLS COMPLIMENTING LIVE NATIVE PLUGINS, PACK 1
Voxengo SPAN. Considered The Best Free Spectrum Analyzer in the Web.
Voxengo MSED. Great M/S Processing Tool
Stereo Tool from Flux. The Most Sophisticated Stereo Field Analyzer out there
Sonalksis FREE G. Great peak/RMS meter with different ballistics options
Audiocation Loudness Meter (ACR-128) — LU/LUFS Meter with sophisticated scaling options (Free Mono/Stereo Phase Meters are also available)
Bitter from StillWell Audio and X-ISM from SSL. True InterSample Peak Meters to choose from (I prefer X-ISM as more informative and handy, but more CPU heavy)
Backdrop (Mac). Turns your screen “ON/OFF”, for those using ears less than they should staring into Spectrum Analyzers far too often)
These are some guidelines to start with, do hope they will be of use.
Walk And Ye Shall Reach.
Written by: Andrey Romanenko (Kiev, Ukraine)
2016 @ Copyright. All Rights Reserved